How to Install Heated Floors for Warm Feet All Year.
Learn how to install radiant heat flooring with our nine-step process that is simple enough for skilled DIYers with some electrical experience.
Icy cold feet? Brrr! Learn how to install heated floors, and you can solve that problem, even in winter. This luxurious home upgrade is added beneath flooring and is controlled via a thermostat.
Conventional heating systems create temperature zones in different parts of a room. These zones can make sections or levels of the room uncomfortable and prompt you to raise the heat setting to warm up the cool spots. Radiant floor heating warms the entire area to a consistent, comfortable temperature. It also heats without blower noise and dust.
Most homeowners can expect to spend several days installing radiant heat flooring and should have electrical experience. However, the exact time frame depends on skill level and the situation. Underfloor mats may install more quickly, but above-floor mats are more efficient because the heating element directly interacts with the finished flooring.
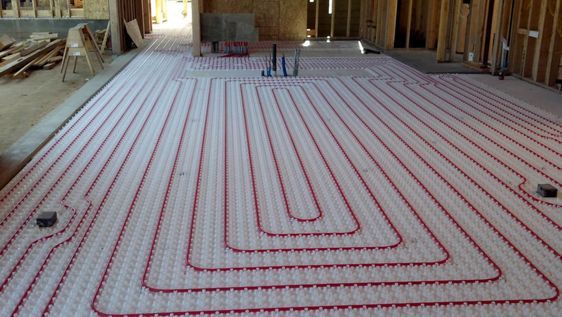
If you have to rip up old flooring to install the heat pads, it will take considerably more time than if your subfloor is already exposed. Plus, not all systems are wired the same. Some use flat ribbon strapping and cable leads that connect to the thermostat. Others must be wired to a switch. This how-to shows the latter method.
Before You Begin: Sketch Your Plan and Choose Flooring
Before you purchase a radiant heating system, sketch the room where it will be installed. Mats or piping are not required under closets, major appliances, and vanities. About 50 percent of the floor area in bathrooms should be heated; in kitchens and living areas, about 60 percent.
Carefully sketch the system wiring on a dimensional plan. Note the thermostat’s location and any other electrical switches or outlets in the room. If possible, locate the thermostat on an interior wall, making drilling through the floor plate easier. Place the thermostat as close to the power source as possible. Long lead wires from the power source can reduce the system’s efficiency.
Now is also a good time to choose your flooring material. You can install almost any finished flooring over radiant heat, but the key to the system’s performance is how well the flooring material conducts heat. Ceramic tile and stone are the best conductors and will allow the system to run more efficiently than other materials. Parquet and laminate are also good conductors. Carpet tile is thinner than broadloom carpet but still acts as insulation and won’t distribute heat as well as solid materials. Vinyl tile has almost no R-value, so it’s a good choice but should not be heated above 85 degrees.
What You Need:
Pencil
Junction box
Measuring tape
12/2 cable
Radiant heat flooring mats
Ohmmeter
Double-faced tape
Chisel
Hot glue gun
Hot glue sticks
3/8-inch notched trowel
Thinset
Tile, or desired flooring material
Grout
Screwdriver
How to Install Heated Floors
Mark the location of where you’d like the new thermostat to go on the wall and install a junction box. Use a flanged box in new construction and a retrofit unit for an existing wall. In both cases, install the box 60 inches above the floor.
Using 12/2 cable, add a new circuit or extend an existing circuit but don’t connect the circuit to the power source. The wiring goes through the subfloor and basement, up through the wall, and into the junction box. If desired, you can hire an electrician to do this step.
Editor’s Tip: Checking the amperage a new installation demands tells you whether an existing circuit can carry the load or you must install a new one. Each square foot of electric radiant heating mat draws 0.1 amp. That means adding radiant heating mats to the work area of an average-size kitchen adds only 5 or 6 amps to the circuit (50-60 square feet of mat). Each component in the system, such as a dimmer or timer, must be rated to take the amperage.
Step 1: Install Junction Box
Step 2: Check Mat’s Resistance
Unpack the mat. Check the resistance using an ohmmeter, an electronic device for measuring resistance in an electronic component or circuit. Touch one of the ohmmeter probes to one end of the circuit and the other probe to another. The reading should be within 10 percent of the rating listed on the UL label. Write the reading on a piece of paper. You’ll need it when installing the mat to make sure the heat cable hasn’t been nicked during installation.
Step 3: Tape Mat to Subfloor
Clean the floor of debris and tighten any protruding screws or nailheads. Roll out the mat, so it’s no closer than 3 inches to walls and fixtures to plan your layout. Once you’ve decided where it should go, fasten it with strips of double-faced tape.
Editor’s Tip: In a bathroom, mats can run under a toilet but must be at least 3 inches from the toilet ring. In addition, a mat can run beneath the kick plate of a vanity. Never overlap mats, cut a mat to fit, or attempt to repair a cut or nicked heating wire. If the wire is damaged, you must replace the entire mat.
Step 4: Sink the Power Lead
If the power lead is thicker than the mat (some come with flat ribbon leads), you can sink it into the substrate. Use a cold chisel to cut a channel if it’s a cement backer board. If you’re going through a wood subfloor, use a wood chisel. If you don’t recess the lead, you’ll have to make sure it’s covered with thin-set.
Step 5: Glue Power Cable
Hot-glue the power cable to the substrate. Run a continuous bead of hot-glue along the power cable, working a few feet at a time. Press the cable into the bead of hot-glue.
Step 6: Apply Thinset and Tile
With the flat side of a 3/8-inch notched trowel, apply thin-set over an area of the mat. Then turn the trowel over and rake the thin-set to a 1/4-inch uniform depth. Be careful not to snag the mat. Don’t clean the trowel by banging it on the mat. Tile the area of the floor covered with thin-set. Repeat until floor is completely tiled.
Step 7: Recheck Mat’s Resistance
Recheck mat resistance using the ohmmeter. If the ohm reading drops to 0 or infinity, the heating element has been damaged, and you must replace the mat. Take extra care when tiling over a heating grid to avoid damage to the mat.
Step 8: Connect Thermostat
Using a jeweler’s screwdriver, attach the two sensor wires to the screw terminals on the back of the control. Connect the ground from the mat power lead directly to the house ground. Continue wiring the thermostat connections, following the manufacturer’s instructions.
Step 9: Attach Faceplate
Connect to the power source or connect the line to a new breaker. Attach the faceplate. Turn on the power and follow the manufacturer’s instructions for setting the temperature and timer.